Showing posts with label torchio. Show all posts

Friday, January 28, 2022

Bronze Pasta Dies Revisited

I recently corrected a couple of my old blog posts that focus on bronze pasta dies, specifically dies that work in Bottene’s Torchio Model B manual pasta press. Here’s why. 

Back in 2011, I contacted Emiliomiti (here) to inquire whether it sold additional dies for a Bottene Torchio Model B that I purchased in 2010. My Model B came with two dies, one to make bigoli and another for gargati. Emiliomiti replied that although it occasionally receives different dies made specifically for the Model B, heavier bronze dies made for an electric extruder should also work in my hand cranked torchio. To test this out I purchased a No. 464 Casarecce die (here) and—yes—the die worked perfectly in my torchio.


In my 2011 post about this experiment, I wrote that this No. 464 die was designed for La Monferrina’s Dolly electric extruder. In fact, the die I received was designed for Bottene’s Lillo electric extruder and not the Dolly.

With hindsight, this makes perfect sense because Bottene makes both the electric Lillo extruder and manual Torchio Model B handpress (and not the Dolly). I should have picked up on this sooner because back in 2017 I bought a No. 171 ridged macaroni die (here) that didn’t quite fit my torchio. I know now that I inadvertently received a Dolly-compatible die instead of a Lillo die. No big deal: Emiliomiti replaced the Dolly die with a Lillo/Torchio Model B-compatible die.


All this die information came to light this January 2022 when I spoke to Emiliomiti about buying an electric extruder. I’m looking at La Monferrina’s Dolly III and Bottene’s Lillo Due. I learned that one benefit of buying the Lillo Due is that this electric extruder can use certain dies that that I already own and use in my Torchio Model B, specifically any die that has a round hole drilled into its back like the die picture below.


This hole seats the Lillo’s motor-driven auger. A Torchio Model B die that does not have a similar hole drilled out in the die's back will not work in the Lillo even though the die works in the Torchio Model B.


Simply stated, Bottene made it possible to use any Lillo die in its Torchio Model B, but not every Torchio Model B die will work in a Lillo.  Finally, dies made for La Monferrina’s Dolly extruders will not fit in either the Lillo Due or the Torchio Model B. The face of a Dolly die is too wide to seat properly in Bottene's Lillo and Torchio Model B die holders.


Thursday, June 11, 2020

Tonnarelli


I posted my first article on this website ten years ago. I wrote about bigoli, a Venetian spaghettoni that I made on a hand-turned pasta press called a torchio.


Since writing that first post, I’ve made a lot of pasta with my torchio using different bronze dies that craft a diverse range of pasta shapes. I learned that certain dies produce better results when extruding a particular kind of pasta dough. I now use one type of dough when making a fine, long pasta (here) and another when I want a short pasta (here).


Yet even with my pasta journal full of tested recipes, I still experiment: sometimes to affect a change in my pasta’s texture and/or flavor; sometimes based upon the ingredients that I have—or don’t have—on hand; and, occasionally, just for fun.


I want to share another torchio pasta dough recipe that I recently developed. I aimed to make a chewy-textured long string pasta that extruded without excessive sticking. To realize these qualities, I use my standing mixer fitted first with a paddle and then with a dough hook to knead the dough.


115 grams Central Milling Organic Semolina

115 grams Central Milling Organic Type 00 Normal

4 grams Diamond Crystal kosher salt

2 medium eggs

water


1) Put the 230 grams of flour and salt into the bowl of a standing mixer equipped with a mixing paddle. Mix to combine the flour and salt.


2) Place a glass beaker on a scale, tare the scale and add the eggs to the beaker. A medium-grade egg weighs approximately 50 grams, so the eggs in the beaker should weigh about 100 grams. Add water to the beaker so that the egg mixture weighs a total of 112 grams. If the 2 eggs weigh more than 112 grams, remove enough egg white to reduce the weight of the eggs to 112 grams. Whisk the beaker’s contents together.


3) Turn on the mixer and set it at its lowest speed. Slowly add small amounts of the beaten egg mixture into the flour. Patiently wait between each small pour to allow the mixer to incorporate the egg into the flour. From start to finish, the step of adding the egg mixture to form the dough should take about 3 minutes.


4) When the dough comes together (see photo above), turn off the mixer and replace the paddle with the mixer’s dough hook attachment. Turn the mixer back on to low and knead the dough for 10 minutes. Remove the dough from the mixer.


5) Form the dough into a log shape that will fit into the torchio’s chamber. Very tightly wrap the dough log twice in plastic film and let it rest at room temperature for 30 minutes. Tightly wrapping the dough helps hydrate the dough.


6) After 30 minutes, unwrap the dough and knead it by hand for 30 seconds to firm up the dough. Ready your chosen torchio die and place the dough in the torchio’s chamber.  Set the piston into the chamber and turn the handle. Cut the pasta at your desired length. The pasta should feel just a tad sticky. When making a long string noodle, I dust the cut pasta with semolina flour before placing the pasta on a tray to dry out for an hour or so. 


The above recipe makes enough pasta to serve 4. When I began developing this recipe, I used 115 grams of flour, one egg and some water. This produced a dough that happily skirted around the dough hook in the mixing bowl. So I doubled the qualities and problem solved.


I bought a new bronze die to use with this dough: a 3mm square spaghetti die that Emiliomiti (here) calls spaghetti alla chitarra. Per Oretta Zanini De Vita’s Encyclopedia of Pasta, the pasta chitarra (guitar) ”…consists of a wooden frame (beech or other neutral wood) strung with parallel steel wires.” The pasta maker places a thick-ish sheet of pasta on top of the “strings”. Zanini De Vita continues: “[u]nder the uniform pressure of a rolling pin, the strings cut the pasta to make the famous maccheroni, which are a sort of square spaghetti about 12 inches (30 cm) long. They are boiled in salted water.”


In Molise maccheroni alla chitarra is called crioli, in The Marche stringhetti, and in Lazio it is tonnarelli. If you like to make cacio e pepe, the above dough paired with the tonnarelli die will make you very happy. I also used the dough in my torchio fitted with a No. 98 rigatoni die. The pasta tasted great, but the tubes didn’t hold their shape after extruding.


I originally started this food blog, in part, as a lark, thus its silly name. If I had known I’d be at it for ten years, I might have considered a more serious moniker. But…maybe not. What could possibly be more Serious than a Bunburyist? Another ten years?


Friday, February 28, 2020

Buckwheat Bigoli


In June of 2020, A Serious Bunburyist turns 10 years old. I conceived of this website as a place where I would share information about pasta-making, review new cookbooks and memorialize some of my favorite recipes. In my inaugural post I shared a recipe to make a regional Italian pasta called bigoli in a bronze Venetian pasta press called a torchio da bigoli (here). Over the years I’ve posted a number of different bigoli recipes on this site. To start 2020, I want to share another one, this time a dark bigoli version made with buckwheat flour.

Dark Bigoli (Bigoli Scuri)

Oretta Zanini De Vita’s Encyclopedia of Pasta (2009) lists bigoli’s ingredients as “[g]enerally whole-wheat flour made from durum wheat, but sometimes soft-wheat flour, water, and salt, and often duck or hen eggs.”  Zanini De Vita makes no reference to buckwheat flour, but she notes in her remarks that bigoli “…was always dark until not long ago because peasant women made it from whole-wheat flour.” 

In Bugialli on Pasta (1988), the late Italian food historian and teacher Giuliano Bugialli writes “[o]riginally, dark bigoli probably were made using buckwheat flour, since the grain was once plentiful in the Tre Veneti. (Today, the region is more commonly known as Friuli-Venezia Giulia.) But earlier in this century the Italian government began to require that certified commercial pasta be made only from durum wheat flour, and soon even in the home whole-wheat flour came to replace the buckwheat.”

As Bugialli points out, regional Italian pasta makers were—and still are—naturally opportunistic and used available ingredients. In the Encyclopedia’s Entry No. 200 for Pizzoccheri, Zanini De Vita writes “[t]he cultivation of buckwheat in the alpine valleys from Lombardy to Trentino was already widespread toward the fourteenth century, especially in Carnia….” Italy’s Carnia province lies approximately 40 miles northeast of the Veneto region. Whether buckwheat is the original bigoli flour or not, one can easily imagine buckwheat pasta dough finding its way into a Venetian torchio.

Buckwheat

Buckwheat, a flower seed and not a true wheat grass grain, presents challenges to the pasta maker because buckwheat flour contains no gluten. Buckwheat’s characteristics differ by variety, but generally its seeds have a very dark, bitter-tasting outer hull that surrounds a lighter-colored triangular kernel (aka groat). After de-hulling the seeds, mills grind the groats to make buckwheat flour.

Most buckwheat noodle recipes, whether to make Italian pasta or Japanese soba, blend wheat and buckwheat flour to strengthen the dough. In Cooking By Hand (2003), Paul Bertolli writes that buckwheat flour “…has a forceful taste all its own, though the necessity of mixing it with a greater proportion of white flour to strengthen the dough structure also serves to tone down its flavor.” Bertolli’s buckwheat flour blend in Cooking By Hand is approximately 30% buckwheat flour and 70% extra fancy semolina (aka extra fancy durum).

In my experience, extruding a buckwheat dough (e.g., in a torchio) permits the pasta maker to reduce the amount of wheat flour used when making buckwheat pasta without detrimentally affecting the dough’s structure. Exceptions to this general rule exist, especially if making pasta with a coarse, stoneground buckwheat flour containing flecks of hull. However, using a torchio to extrude buckwheat pasta generally allows the pasta maker to focus on taste and texture and worry a little less about dough strength.


Over the last three years I have made buckwheat pasta with buckwheat flour from a number of sources. I used my KoMo grain mill to grind fresh buckwheat flour from store-bought groats. I tried different buckwheat flour from mills here in the Pacific Northwest and beyond. My favorite homemade buckwheat pasta uses a Japanese Ni-Hachi style soba flour (80% buckwheat and 20% type 00 wheat flour) that I bought on-line from Anson Mills in South Carolina. I enjoy the flavor and texture of pasta made from this finely ground blend.


The following recipe, which serves 2, uses Anson Mills’s soba flour without adding any additional wheat flour. The first few times I tried this soba flour to make bigoli with my torchio, I added small amounts of extra wheat flour believing I needed to strengthen the dough. I found adding additional wheat flour unnecessary. Anson Mills’s buckwheat-rich blend works just fine as is with a torchio.

1) Put 115 grams of Anson Mills Ni-Hachi style soba flour into the bowl of a standing mixer equipped with a mixing paddle.


2) Put 1 whole large egg and 1 egg yolk into a glass beaker and beat the egg mixture together.

3) Turn on the mixer and set it at its lowest speed. Very—and this is important—slowly add small amounts of the beaten egg mixture into the flour. Patiently wait between each small pour to allow the mixer to incorporate the egg into the flour. From start to finish, the step of adding the egg mixture to form the dough takes me about 10 minutes, more or less.

You will probably not need to add all of the egg mixture to get the proper consistency for this particular pasta dough. On average I use approximately 58 to 59 grams of the egg mixture for 115 grams of Anson Mills’s soba flour. The dough should not come completely together in the mixer bowl and will look crumbly. I point this out because it is very easy to over-hydrate a buckwheat-rich pasta dough and a sticky dough can cause a mess when extruding a long, thin noodle like bigoli. Here’s a picture of the ready dough in my mixer bowl.


4) Remove the bowl from the mixer and reach into the bowl to bring the dough together with your hand. Form the dough into a log shape that will fit into the torchio’s chamber. The dough will look and feel dry, but don’t worry, it will soften as it hydrates in step 5, below. 


5) Very tightly wrap the dough log twice in plastic film and let the dough rest at room temperature for 30 minutes. Tightly wrapping the dough helps to hydrate the dough.

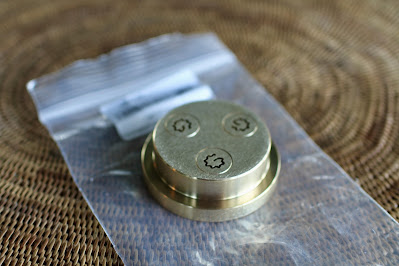
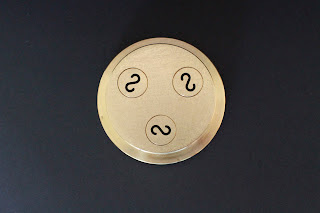
6) After 30 minutes, unwrap the dough, assemble your torchio with a bigoli die and place the dough in the torchio’s chamber.  Set the piston into the chamber and turn the handle. Cut the pasta at your desired length. (I aim for approximately 8-inch long noodles.) The extruded bigoli should feel just a little tacky, but not unworkably sticky.

Once cooked, this dark buckwheat bigoli boasts a pronounced toasty, almost nutty flavor. Many traditional Northern Italian recipes for buckwheat pasta (e.g., bigoli, blecs, grumi di grano saraceno and pizzoccheri) call for less buckwheat and include milk and butter in addition to eggs. These ingredients, although delicious, often mask buckwheat’s unique flavor.


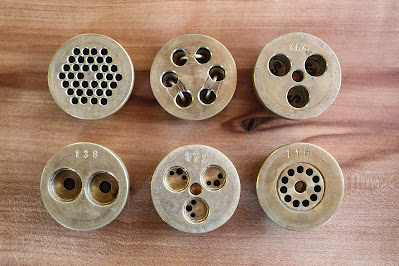
If the idea of a buckwheat-extruded pasta appeals to you, feel free to try different buckwheat blends and torchio dies to create a pasta that has your desired taste and texture. I like making a buckwheat version of fiorentini (here). Or consider using a spaghetti quadri die (here) to create a square, soba-like noodle.


Finally, I cannot end this post in good conscience without providing this caveat: Extruding a dry dough will put stress on a torchio and, after extruding your pasta, you may find it difficult to remove the die ring nut by hand. I solve this problem by employing a rubber mallet to gently tap the die ring nut clockwise to loosen it.


Thursday, November 14, 2019

6mm Ridged Macaroni Die No. 169


A couple of weeks ago, Emiliomiti had a pasta die sale to celebrate World Pasta Day. I bought a bronze 6mm ridged macaroni die (catalog No. 169) for my Bottene Torchio Model B. Emiliomiti currently offers five different macaroni dies for the torchio with the No. 169 making the smallest pasta of the lot. I picked the No. 169 because its size works particularly well in both soup and sauce.  To my taste, elbow macaroni dressed in a tomato sauce, with or without meat, represents the ultimate in comfort food.


Here in the United States, say “macaroni” and most people, especially kids, will conjure the image of a elbow-shaped pasta that is often served in a thick, orangey cheese sauce. The English-language edition of Oretta Zanini De Vita’s Encyclopedia of Pasta defines maccherone (entry No. 140) as a “[g]eneric term for various types of pasta, both fresh and dry, which are boiled in abundant salted water or in broth.” Zanini De Vita writes:

“The story of maccherone on the Italian peninsula has followed tortuous paths that have not yet been fully charted. Today, the term generically indicates a dry pasta of various sizes made with durum-wheat flour and water. But in the south, the word maccheroni is used for some types of fresh pasta and, even more often, for any dry pasta, long or short, from penne to spaghetti to bucatini. In the north, once dominated by rice and polenta, the word maccheroni is the name of a specific type of pasta, usually tubular, short, and curvilinear, like conchiglie (see entry [No. 61]).”


I christened my new No. 169 die with a dough of 80 grams of Central Milling Organic Type 00 Normal, 35 grams Central Milling Extra Fancy Durum, 1.5 grams fine sea salt, and 65 grams of an egg mixture comprised of 1 whole egg and 1 egg yolk. I used a standing mixer fitted with a paddle to make a dry-ish, clumpy dough that I formed into a long, thin log. I tightly wrapped this dough log in two sheets of plastic and left it to hydrate at room temperature for 30 minutes. I then removed the plastic wrap, loaded the dough into the torchio fitted with the No. 169 die, and cut the pasta after a quarter-turn of the extruder’s handle. (Actually, my wife cut and I turned. When making a diminutive shape, operating a torchio solo is a real pain in the back.)


I look forward to enjoying these 6mm macaroni in lots of different types of pasta sauces and in soups such as sagne e lenticchie. I paired my freshly minted elbows with some leftover braised lamb shoulder, a little of the lamb’s braising liquid and some peas, all finished with a heavy-hand of Parmesan and Pecorino Romano cheese. I can’t wait to try the small macaroni with polpettine in a tomato sauce. True comfort food.

Monday, October 21, 2019

Pasta Lunga Dough for a Torchio


I first made the pasta dough featured in this post on World Pasta Day—25 October—back in 2016. The dough contains a blend of freshly milled and bolted White Sonora flour (here) and Organic Artisan Baker’s Craft bread flour from Central Milling. I developed this dough for use in a torchio pasta press (here) and it works extremely well when extruding long forms of pasta (e.g., spaghetti, spaghetti quadri (here) and even capelli d’angelo (angel hair)). 


I previously covered my approach to milling (here) and bolting flour (here). The following recipe, which makes enough pasta to serve 2 or 3, includes precise weights based upon the results that I consistently achieve with my KoMo Fidibus Classic grain mill and Gilson Company No. 40 and No. 50 stainless steel test screens. Different milling and bolting set-ups will yield different results. Treat the following recipe as a guide and adjust, adding more or less of an ingredient, as necessary. It may help to know that the 85 grams of twice bolted White Sonora flour described in step 8, below, constitutes approximately 57% of the total flour used to make the pasta dough.

1) Place a medium-sized pouring bowl on a scale, tare the scale and put 275 grams of White Sonora wheat berries into the bowl.


2) Adjust your grain mill to a fine—but not its finest—setting. On my KoMo Fidibus Classic mill, I set the grind indicator near the top left mitre joint of the face of the mill’s housing.

3) Place a clean sheet of parchment paper (approximately 13” x 15”) on your work surface under the mill’s spout. The paper needs to be large enough to catch the flour that falls through the bolting sieves.

4) Put a full height No. 40 sieve on top of the parchment paper under the mill’s spout. Turn on the mill and add the 275 grams of White Sonora wheat berries into the mill’s hopper. While the mill processes the flour into the sieve, replace the pouring bowl onto the scale, which should read zero.

5) After the mill finishes grinding the wheat berries, lift the sieve with one hand and lightly tap the sieve against the heel of your other hand so that the flour moves back and forth across the screen’s face and flour gently falls onto the parchment paper. Stop bolting when the falling flour begins to slightly darken and the remaining material in the sieve looks coarse compared to the bolted flour.

6) Pick up the parchment sheet on either side and carefully pour the sifted flour into the bowl on the scale. 275 grams of Sonora White wheat berries milled and sifted as described above produces approximately 130 grams of flour.

7) Replace the parchment sheet onto the work surface and put a full height No. 50 sieve on top of the sheet. Pour the ±130 grams of flour in the bowl into the sieve and replace the bowl onto the scale. Bolt the flour through the No. 50 sieve onto the parchment paper. Again, the material in the sieve will slowly darken as the flour makes its way through the screen, leaving behind bran and other material.


8) Carefully lift the sheet and pour the sifted flour into the bowl on the scale. You should have approximately 85 grams of White Sonora flour. 

9) Add 65 grams of Central Milling Organic Artisan Baker’s Craft flour to the White Sonora flour. You want the flour mixture (i.e., the bolted White Sonora flour and the Artisan Baker’s Craft flour) to weigh 150 grams. Stir the flour to blend.

10) Add 1 whole large egg and 2 egg yolks to a glass beaker and beat together. The egg mixture should weigh approximately 100 grams.

11) Put the 150 grams of flour into the bowl of a standing mixer equipped with a mixing paddle.

12) Turn on the mixer and set it at its lowest speed. Very—and this is key—slowly add small amounts of the beaten egg mixture into the flour. Patiently wait between each small pour to allow the mixer to incorporate the egg into the flour.


Most likely you will not need to add all of the egg mixture to get the proper consistency for this particular pasta dough. On average I use approximately 85 to 88 grams of the egg mixture. The dough should look clumpy, but not too dry. After removing the dough from the mixer’s bowl, you should be able to form it into a ball that retains its shape. The dough will feel a little dry, but don’t worry, it will soften as it hydrates in step 13, below. From start to finish, the step of adding the egg mixture to form the dough takes me about 6 minutes, more or less.


13) When the dough comes together as described in step 12, above, turn off the mixer and form the dough into a log shape that will fit into the torchio’s chamber. Very tightly wrap the dough log twice in plastic film and let it rest at room temperature for 30 minutes. Tightly wrapping the dough helps the dough to hydrate.

14) After 30 minutes, unwrap the dough, screw in your chosen torchio die and place the dough in the torchio’s chamber.  Set the piston into the chamber and turn the handle. Cut the pasta at your desired length. The pasta should feel dry and not unworkably sticky. When making a very thin noodle such as capelli d’angelo, I dust the cut pasta with semolina flour before placing the pasta on a tray to dry out a little. 


Although this dough works particularly well when making long noodles—this is my go-to recipe for thin soup noodles—don’t limit this dough to making pasta lunga; the dough works great for rigatoni (here), gramigna (here) and, well…a lot of different pasta shapes. The combination of the soft White Sonora’s elasticity and Central Milling’s hard bread flour produces a fantastic tasting pasta well-suited for a torchio. If you want to roll this dough with a pasta machine, soften up the dough by adding more of the egg mixture. If you do not own a grain mill and want to try out the recipe, consider using Hayden Flour Mills White Sonora Type 00 flour.

Happy Pasta Day, everyone!


Monday, May 27, 2019

Pasta Grattata


After sliding dough into the chamber of my torchio pasta press, I insert the machine’s piston and turn the handle until a small amount of pasta—about 1/4-inch—pokes through the bronze die. I trim this pasta off and put it aside before turning the torchio’s handle in earnest to extrude the dough.

Sometime ago while making bigoli (here), I made my customary trim cut. This time it struck me that the small bits of pasta that I held in my hand resembled a unique pasta shape in their own right. I made a mental note to do a little research to find the shape’s name.


A couple of days later, by a happy stroke of serendipity, I came across a package of grattini at DeLaurenti, an excellent food and wine shop in Seattle’s Pike Place Market. Although grattini looked slightly different than the pasta I trim off of my bigoli die, the package gave me a lead.


Oretta Zanini De Vita writes that grattini is the Emilian name for Pasta Grattataentry No. 187 in her Encyclopedia of Pasta (University of California Press, 2009). Pasta grattata literally means “grated pasta”. The shape goes by a myriad of different names from Italy’s north to south. In Emilia it’s grattini. In Friuli, it’s called pasta grattada and mignaculis. In the Veneto it goes by the name of pasta gratada, pasta gratadè and pestariei. Lombardy, Tuscany, Lazio, Abruzzo, Molise, Basilicata, Puglia and Sicily each have their own unique name for the shape.

The traditional way to create pasta grattata is to make a very hard dough from flour and water, to dry the dough, and then to grate it “on a large-hole grater, or [crumble] it with fingers, to make [irregular tiny shapes that are cooked in broth].” Zanini De Vita writes that nowadays you are more likely to find pasta grattata made with an egg dough, which the package of grattini, above, proudly proclaims.
As I searched for grattini through Zanini De Vita’s Encyclopedia, I came across another pasta shape that resembles my bigoli trim. Grandine, entry No. 119, literally means “hailstones”. Like pasta grattata, one finds grandine throughout Italy’s regions. Although the shapes resemble one another, Zanini De Vita writes that grandine is a mass-produced shape made with durum flour and water. In Sicily, grandine goes by the name of pirticuneddi and palline da schioppo (“musket balls”). Zanini De Vita ends her grandine entry by writing: “In Sicily, pirticuneddi are mentioned among the first pastas made with a special torchio, the so-called paste d’arbitrio.

If you own a torchio, making pasta grattata—or grandine, it’s your call—at home is super easy. It just takes some time and, I believe, two people: one to make small incremental turns of the torchio’s handle and another to cut the hundreds of tiny bits of pasta that come through the press’s spaghettoni die. I suppose a person with a strong back could both turn and then bend down to cut, but that’s way too much up-and-down to my mind.
If you don’t own a torchio, you can make pasta grattata the old fashion way with a box grater. I found a recipe by the late, great Giuliano Bugialli’s (here). You can find his recipe in Bugialli on Pasta (Simon & Schuster, 1988). Bugialli calls the shape pasta grattugiatapasta grattata or pasta rasa. He introduces the shape as follows: “Pasta grattugiata exists in different parts of Italy under various names. While this kind of pasta is homemade, it has even been adapted to commercial dried pasta under the name of grandinine or pastine, and in modern times is used mostly in broth.” 
I find Bugialli’s recipe, which originates from Reggio-Emilia, particularly interesting. He mixes all-purpose flour, very fine semolina flour and freshly grated Parmigiano cheese with eggs to make a dough similar to the one used to create passatelli sans the dry bread crumbs. Bugialli also shares a neat trick to prepare the dough for grating: knead the dough for 15 minutes until it turns very hard, then wrap it in plastic and freeze the dough for 45 minutes. Why? He writes: “This replaces several hours of drying.”
As both Zanini De Vita and Bugialli point out, most cooks serve pasta grattata in a broth or soup. I suppose one could also cook the shape like risotto. I plan to try pasta grattata in a pea pod broth with polpettini, leeks and peas all dusted with pecorino cheese.

Thursday, April 18, 2019

Stinging Nettle Powder Pasta


I wrote (here) about making green pasta with a torchio pasta press. During my research to create a torchio-friendly green dough, I came across an interesting note in Marcella Hazan’s Essentials of Classic Italian Cooking (Knopf, 2008).

Outside of spinach, no other coloring can be recommended as an alternative to basic yellow pasta. Other substances have no flavor, and therefore have no gastronomic interest. Or, if they do contribute flavor, such as that of the deplorable black pasta whose dough is tinted with squid ink, its taste is not fresh. Pasta does not need to be dressed up, except in the colors and aromas of its sauce.

Other pasta masters take a more favorable view of flavored pasta. In Bugialli on Pasta (Simon and Schuster, 1988), Giuliano Bugialli devotes an entire chapter to flavored pasta and shares dough recipes incorporating: tomato paste; saffron; paprika; tomato and oregano; green bell peppers; red bell peppers; artichokes; wild mushroom; rosemary; sage; black pepper; and lemon.

Marc Vetri’s Mastering Pasta (Ten Speed Press, 2015) also dedicates an entire chapter to flavored pasta (including a recipe for squid ink pasta). Thomas McNaughton’s Flour + Water Pasta (Ten Speed Press, 2014) contains recipes for Cocoa Tajarin, Tomato Farfalle and Red Wine Rigatoni. Even a modern classicist like Paul Bertolli includes a recipe for herb pasta in his masterwork Cooking by Hand (Potter, 2003).

Most vegetable or herb dough recipes recommend either hand chopping or puréeing the flavoring and then working it into the flour during kneading. In some cases, such as Bugialli’s artichoke-flavored pasta, the recipe calls for braising the artichokes, then using a food mill to purée the artichokes, and finally reducing the purée into a thick paste before incorporating the flavoring into the flour. Reducing a purée eliminates extra liquid and concentrates flavor.

Using a dried powdered ingredient delivers the essence of a flavor without any liquid. Nicolaus Balla and Cortney Burns in their Bar Tartine cookbook (Chronicle Books, 2014) write: “[d]ehydration is more than just a method for preserving food. Extracting the bulk of the water from fruits, vegetables, meats, and fish concentrates flavors and changes textures. It’s one of our most important tools for building flavor.”

Although the exception rather than the rule, pasta dough recipes using dehydrated ingredients exist. In the cookbooks referenced above, Bugialli shares a flavored pasta recipe that calls for paprika. McNaughton’s Tomato Farfalle recipe uses tomato powder.

If you own a dehydrator, you can make a flavoring powder in less than a day. Fresh, stemmed leafy herbs, such as basil, oregano, mint and parsley turn brittle yet bright after 6 to 8 hours in a dehydrator set at 95°F/35°C. Flowers such as fennel, elderflower and cilantro only take 2 to 6 hours to dehydrate. If you don’t own or have access to a dehydrator, you can dry ingredients in a low oven, outside in the sun, or even indoors if you have the time and patience. Another option: experiment with store bought dried ingredients, such as wild mushrooms.

It being spring and owning a dehydrator, I decided to make a pasta dough using powdered wild stinging nettles. After foraging and washing the nettles to remove dirt and bugs, I cut the leaves off their stems and blotted the leaves dry. Following the advice of Balla and Burns, I set my dehydrator to run at 95°F for 8 hours.


Stinging nettles smell extraordinarily wonderful while drying. After 8 hours I put the brittle leaves, which no longer deliver a painful sting but remain prickly, into an electric spice grinder. My five dehydrator trays of nettle leaves produced enough dark green nettle powder to fill a small vial. 


I made two batches of pasta dough with my nettle powder. For the first batch I added 2 grams of nettle powder to 70 grams of Central Milling Organic Type 00 Flour and 43 grams of Central Milling Extra Fancy Durum flour. I made my dough in a standing mixer fit with a paddle using just enough of a whole egg and another egg yolk mixture—about 70 grams—to form a clumpy green dough. Wrapped in plastic film, this dough hydrated for 30 minutes at room temperature. I then placed it into the chamber of my torchio fitted with a lumache bronze pasta die. In minutes I had a trove of dark green snail shells. After making some egg pasta snails, I added the cooked straw and hay lumache into a light sauce of thinly sliced asparagus braised in rice koji stock and finished with a bit of cream, freshly chopped parsley and grated Parmigiano-Reggiano cheese. The nettle pasta had a slight vegetative and nutty flavor.


For my second batch of dough I reduced the amount of nettle powder to 1 gram and used a ziti bronze die. The finished ziti pasta remained green, but less intensely so. I’ll stick with the 2-gram version in the future.


It’s easy to get excited about—and perhaps even carried away with—all the possibilities afforded by using flavored powders to make pasta dough. Circling back to Marcella Hazan’s note that opened this post, I believe one’s own personal taste should govern what one wishes to make and to eat and to share at one’s table. If the idea of making pasta verde appeals to you, give nettle powder a try.